Simple iOS 5 UI Design Tutorial Using Storyboard in XCode 4
From Kurry Tran's blog.
Simple iOS 5 UI Design Tutorial Using Storyboard in XCode 4
Background Info (Not Necessary Reading): I read a 500 page book on
Objective-C on Saturday and so I thought I was ready to start
programming iPhone apps, so then I looked at a ton of books and tried to
do the step-by-step tutorials but none of them made any sense since
Apple has updated all of their development tools and there are a lot of
new features that have made things in the past irrelevant. For example,
XIB files were not automatically generated in the newest version of
XCode, so it was a struggle to get even a simple program running. I
didn't even know how to design a user interface, so being confused I
naturally Googled the file in XCode that I didn't know what is was
(storyboard) and I saw that it was Apple's new way to design user
interfaces.
Background
Info (Required): Interface builder is a user interface design tool in
XCode 4 where you can drag and drop objects from the side bar, and have
them saved in a XIB (pronounced "zib") or a NIB file. A XIB file is an
XML representation of your objects and their instance variables, and it
is compiled into a NIB file when your application is built. In the past,
when creating a new view you would have to create a new XIB file for
each view. This had become quite cumbersome since very complex
applications have lots of different views and it is hard envisioning
transitions from each view to the next, so Apple made a very big
improvement in the user interface design process by introducing Storyboarding.
From Apple's Website:
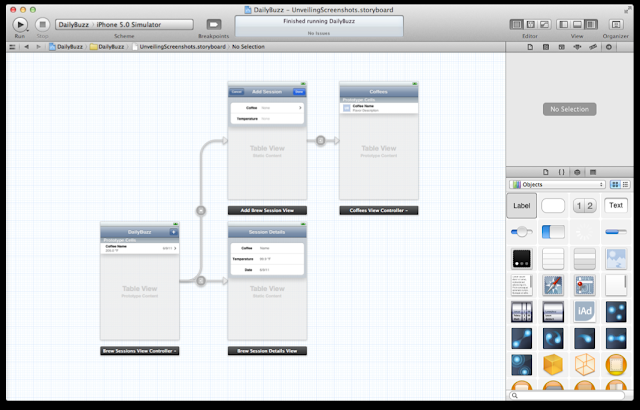
"Discover how Xcode's Interface Builder support for Storyboarding in
iOS 5 makes designing your iOS apps so much easier. Storyboarding allows
you to graphically arrange all your views within a single design
canvas, where you can then define the app's logical flow, and even
assign transition animations."
A Picture Is More Informative:
Source: Apple XCode 4
Goal:
This tutorial will show you how to create a simple two-view application
that switches between both views with a button, created using
Storyboard in XCode 4.
Note:
It's good practice to push every button/toolbar/panel in a new program
that you are getting to know. In most cases you really can't "break"
anything.
Note: A lot of the tutorials just confused me when they were explaining what everything means, so I just left that out.
Tutorial
1. Open XCode 4 and create a new Single View Application called "iPhone_Tutorial_One" and create the repository.
2. Once you reach the main window in XCode 4 click MainStoryBoard.storyboard.
3. XCode automatically generates a single view and now drag and drop a View Controller from the panel on the right.
(Note: From the toolbar select View > Navigators > Hide Navigator to make Interface Builder use the whole main window.)
4. Drag a Label object
from the right panel and double click to type "View One" or "View Two"
text in each label. You can resize the label by clicking and pulling,
and you can adjust the text size by adjusting the default size in the
right panel.
5. Now drag and drop two Round Rect Button(s) and double click to add the text "Info" on one button, and "Switch View" on the other. Repeat.
Note: When you select an object in a view and then CONTROL + CLICK + DRAG you should see a blue line appear.
Note/Common
Error: The direction you drag to and from matters i.e. left -> right
is not equivalent to right -> left, i.e. object1 -> object2 is
not equal to object2 -> object1.
6. Click one of the Switch View button so it is highlighted like below, then holding control then click the Switch View button and drag from the button until the blue line touches the other view. A black pop-up box will come up and select performSequeWithIdentifier:sender. Repeat for the other button.
7. Go to File > New > New File and create a new UIViewController subclass file called SecondViewController.
8. Select the second view and then in the right panel click the drop down menu under the Custom Class title bar and change the Class to SecondViewController.
9. Edit the iPhone_Tutorial_OneViewController.h, iPhone_Tutorial_OneViewController.m, SecondViewController.h, and SecondViewController.m files.
(a) Your file should match this file exactly.
(b) Add the code marked below.
(c) Your file should match this file exactly.
(d) Add the code marked below.

10. Select the Info button on the view labeled View One and CONTROL + CLICK + DRAG from the button to the iPhone Tutorial One View Controller in the left panel and a pop-up menu will prompt you and select pageInfo. Repeat for the other Info button and then connect it to the Second View Controller.
11. The program is all finished. Now you can click Run and the program should build and run.
Related:


Comments
Nice information, this is will helpfull a lot, Thank for sharing, Keep do posting i like to follow this ui online training
ui design course
ui training
online ui training
ui online course
ui courses online
Hope to revisit soon!"
UI UX Training in Mumbai
Design Institute in Pune
xcode in windows
How to Open Nvidia Control Panel - Fixingerror.com